When you hit a website’s address in the browser, it first query your ISP to translate that domain name to corresponding IP address. This process is called DNS resolution. The browser then connects to that IP to start loading your requested page.
You can now understand how critical this is in our daily Internet life. Every time we connect to a website, send an e-mail, or do almost anything on the Internet, it works behind the scenes. If this introduces even a delay of milliseconds with each request, overall browsing speed will decrease a lot. Now, if your ISP’s native DNS resolvers are overloaded of capacity, they can respond a bit slower. Also, some service providers rely on other DNS resolver to fulfil the request, introducing more latency.
What is OpenDNS
It is a free public DNS resolver service, that can be used in place of your ISP’s default resolver. Choosing this service may increase your Internet browsing speed in terms of the critical process explained above. They claim to have a zero downtime. Stats shows that at this time they serve about 3.5 million requests per second.
How to Use OpenDNS
Below is the tutorial for using this service on Windows 7 computers.
1. Go the Control Panel and switch to small icons view. Now go to Network and Sharing Center ⇒ Change adapter settings.
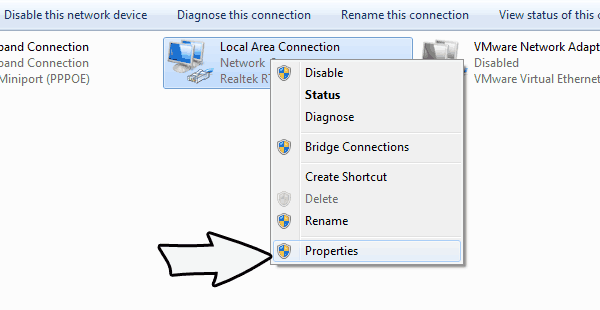
2. Select the network connection for which you want to configure OpenDNS. Generally you should have two options:
- To change the settings for an Ethernet connection, right-click Local Area Connection, and click Properties.
- To change the settings for a wireless connection, right-click Wireless Network Connection, and click Properties.

If you are prompted for an administrator password or confirmation, type the password or provide confirmation.
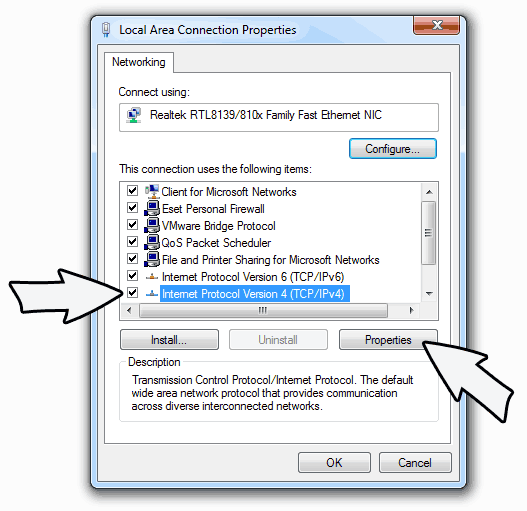
3. In the Properties box, Go to the Networking tab, select IPv4 or IPv6 as per need and click on Properties button.

4. Now click on Advanced button and go to DNS tab. Note down any existing entries for future use and remove them one by one. Click OK.
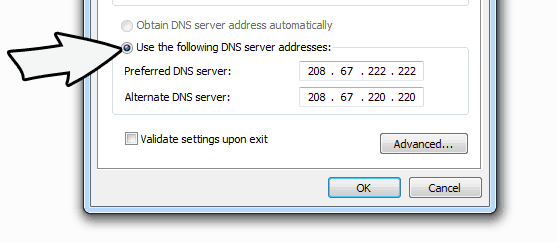
5. In the Properties box, Select Use the following DNS server addresses radio box. If there exist any IP addresses listed in the Preferred DNS server or Alternate DNS server, note them down for future reference.
6. Now, replace those addresses with the IP addresses of the OpenDNS servers:
- Preferred DNS Server: 208.67.222.222
- Alternate DNS Server: 208.67.220.220

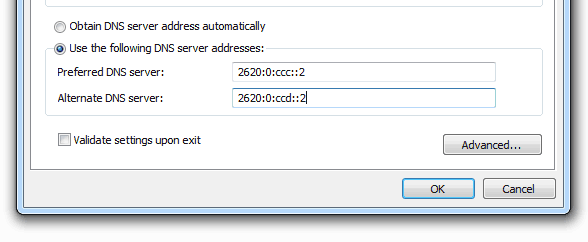
For IPv6 use these values:
- Preferred DNS Server: 2620:0:ccc::2
- Alternate DNS Server: 2620:0:ccd::2

7. Exit all boxes using OK button. Now restart your connection and check if you are able to access websites. If you do, everything is fine and settings are correct.
Note: If you experience a comparatively slower Internet speed after applying this, then revert all settings. Or, you may want to use other similar services like Google Public DNS Resolver, available at no cost.