When we try to access a website, we first type its address (or technically a URL) in the browser. The browser, then query the Internet Service Provider (ISP) for translating that human friendly domain name to computer readable IP address. This process is called DNS (Domain Name System) resolution. The browser then connects to that IP to fetch various page elements. Still confused, this video can help you.
DNS resolution, thus has a great role in providing you the browsing speed. And, this stuff totally depends on your service provider. If they are overloaded, or serving a huge number of DNS lookup requests, they can respond a bit slower than usual. Some service providers query other DNS resolver to fulfil your request. Some has a short TTL which forces them to find everything again, since the last cached details expires after a short span.
All these issues increase the chance of introducing significant latency in the response, which slows down your Internet browsing speed. There are some other dominant causes of DNS latency.
How Can Google Help Here?
Since Google’s search engine keep crawling the web all the time, it resolves and caches DNS information of sites reached during the process. We can take advantage of this and can use their servers for getting the cached DNS information, instead of querying the ISP for fresh lookup every time. This will save much of time and minimise the risk of latency.
How Much Can We Save?
It can reduce the response time by 100-400ms. But mind that even this fraction of time is not tolerable for Web.
How-to Use Google’s Public DNS Service
If you haven’t understood all those stuffs, don’t worry. Here I am explaining how to set them in Microsoft Windows 7 Operating system. Mac and Linux users can refer to this guide.
For Windows 7
1. Go the Control Panel ⇒ Network and Sharing Center ⇒ Change adapter settings.
(Switch to small icons view in Control Panel)
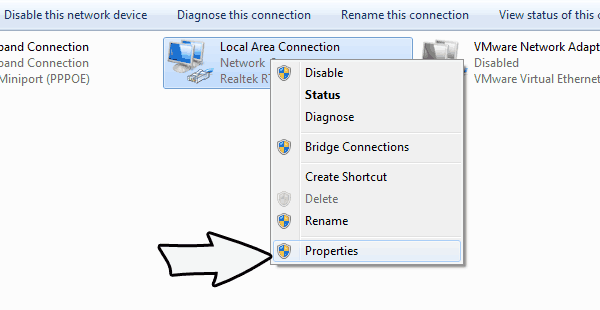
2. Select the network connection for which you want to configure Google Public DNS. Generally you should have two options:
- To change the settings for an Ethernet connection, right-click Local Area Connection, and click Properties.
- To change the settings for a wireless connection, right-click Wireless Network Connection, and click Properties.

If you are prompted for an administrator password or confirmation, type the password or provide confirmation.
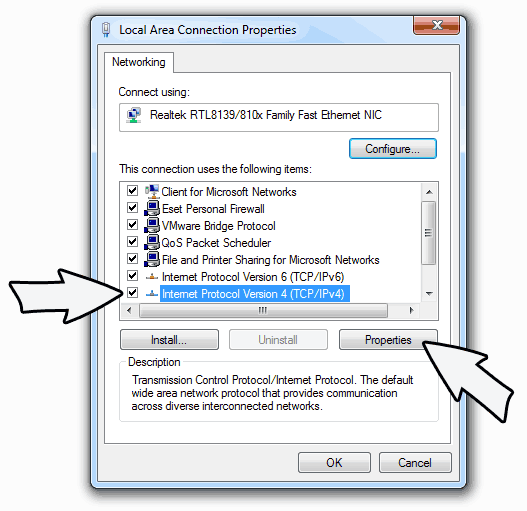
3. In the Properties box, Go to the Networking tab. Now select the Internet Protocol Version you use. If you are not sure at this point, first choose IPv4. Now Click on Properties button.

4. Now click on Advanced button and go to DNS tab. Note down any existing entries for future use and remove them one by one. Click OK.
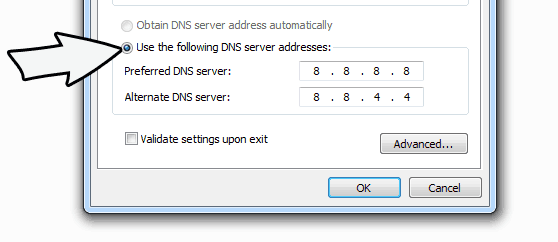
5. In the Properties box, Select Use the following DNS server addresses radio box. If there exist any IP addresses listed in the Preferred DNS server or Alternate DNS server, note them down for future reference.
6. Now, replace those addresses with the IP addresses of the Google DNS servers:
- For IPv4: 8.8.8.8 and/or 8.8.4.4.
- For IPv6: 2001:4860:4860::8888 and/or 2001:4860:4860::8844

7. Exit all boxes using OK button. Now restart your connection and check if you are able to access websites.
8. If you do, everything is fine and settings are correct.