Marketing without data is just guessing. In this post, I break down the exact method I use to track lead sources (UTMs) inside MailerLite embedded forms. I’ll share the exact CSS to hide fields and the JavaScript snippets to auto-fill them, ensuring you know exactly which campaigns are driving your subscribers.
Key Takeaways
- Data Clarity: Learn exactly where your subscribers come from (Facebook, Google, or that specific guest post) without asking them.
- Invisible Tracking: How to add fields to your forms but hide them from the user interface using simple CSS.
- Automated Capture: A copy-paste JavaScript solution that grabs URL parameters and injects them into your form automatically.
- No Extra Tools: Achieve this natively within your HTML/JS setup without paying for third-party connectors like Zapier.
The Frustration of the “Black Box” Subscriber
If you are anything like me, you love data. When I write a deep-dive comparison, like my post on Slashing Datadog Bill, and I see a spike in email subscribers, I want to know exactly where they came from.
Did they come from my Twitter thread? My newsletter swap? Or organic search?
Most email marketing platforms, including the one I use and love-MailerLite-give you basic analytics. But they often treat the “source” as simply “Webform.” That’s useless. I don’t want to know they used a webform; I want to know they came from Campaign A versus Campaign B.
I spent hours scouring the web for a clean, end-to-end tutorial on how to pass UTM parameters (Urchin Tracking Modules) into MailerLite embedded forms. I found bits and pieces-some CSS here, a vague JavaScript snippet there-but nothing that connected the dots completely.
So, I built the solution myself. And today, I’m sharing the code.
Why Should You Care About UTMs?
Before we dive into the code, let’s talk about the why.
According to a report by McKinsey, companies that make decisions based on data are 23 times more likely to acquire customers compared to those that don’t (Source: McKinsey & Company).
If you aren’t tracking UTMs, you are flying blind. UTMs allow you to tag your URLs with specific information.
utm_source: Where is the traffic coming from? (e.g.,google,newsletter)utm_medium: How did they get here? (e.g.,cpc,banner,email)utm_campaign: What was the specific promotion? (e.g.,black_friday_2024)
By capturing this data in your email list, you can segment your audience later. Imagine sending a “Thank You” email specifically to people who subscribed via a Facebook Ad. That is the power of tracking.
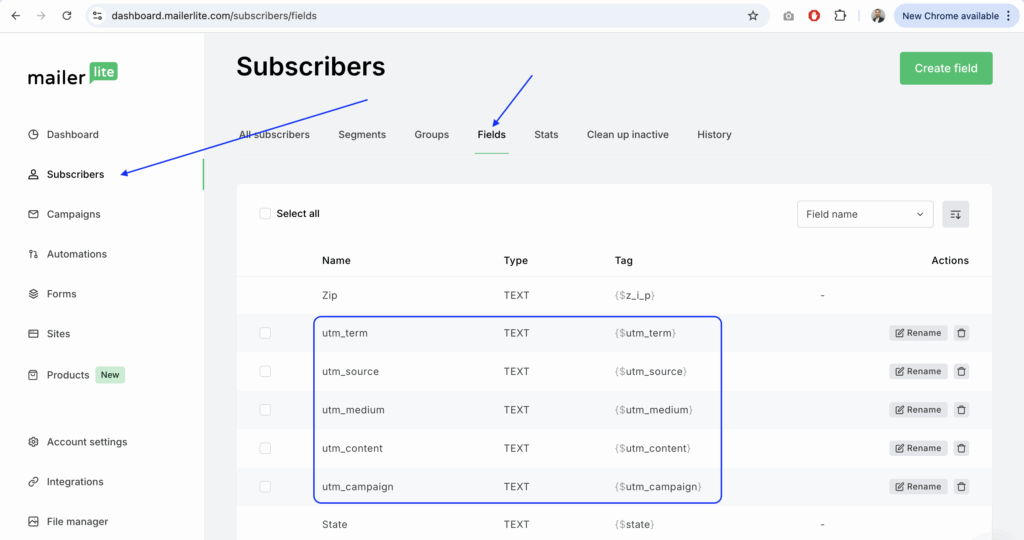
Step 1: Prepare Your MailerLite Dashboard
First, we need to tell MailerLite that we plan to store this extra data. By default, MailerLite only cares about Name and Email. We need to create “buckets” for our UTM data.
- Log in to your MailerLite Dashboard.
- Navigate to the Subscribers main menu.
- Click on the Fields tab.
- Click Create Field.
You need to create a text field for every parameter you want to track. I recommend creating all five standard Google Analytics parameters:
utm_sourceutm_campaignutm_mediumutm_contentutm_term
Note: Keep the data type as “Text”. Once you hit save, these fields exist in your database, ready to receive data.
Step 2: Add Fields to Your Form
Now, go to the Forms section in MailerLite and open the embedded form you are using on your website.
You need to add the fields you just created into the form builder. Yes, I know what you’re thinking: “But I don’t want my users to have to type in ‘utm_source’!”
Don’t worry. We are adding them now so they exist in the HTML structure. We will hide them in the next step.
- Click Add field.
- Select the custom fields you created (
utm_source, etc.). - Save and Publish your form.
At this point, if you were to embed the form, it would look terrible. It would ask the user for their Name, Email, and five weird technical questions. Let’s fix that.
Step 3: The Magic of CSS (Hiding the Mechanics)
We need to make these fields invisible to the human eye but still available for the browser to interact with. We will use CSS to set their display property to none.
When you grab the HTML embed code from MailerLite to put on your site, you’ll need to add a <style> block (or add this to your site’s main CSS file).
You need to identify the specific class names MailerLite assigns to these fields. Usually, they follow the pattern .ml-field-[fieldname].
Here is the CSS snippet to add to your HTML page:
HTML
<style>
    .ml-field-utm_source,
    .ml-field-utm_campaign,
    .ml-field-utm_medium,
    .ml-field-utm_content,
    .ml-field-utm_term {
        display: none;
    }
</style>
What this does: It tells the browser, “Render the form, but visually remove these five specific input boxes from the layout.” The inputs are still there in the code-waiting for data-but your visitor only sees “Name” and “Email.”
Step 4: The JavaScript Logic (Auto-Filling the Data)
Now for the fun part. We need a script that looks at the URL in the browser address bar, grabs the confusing tracking code (e.g., ?utm_source=twitter), and stuffs it into those hidden form fields.
We are going to define a function called fillUTMParams.
Here is the clean, modern JavaScript approach to do this. You can place this in a <script> tag on your page:
JavaScript
function fillUTMParams() {
    // 1. Get the query parameters from the current URL
    const urlParams = new URLSearchParams(window.location.search);

    // 2. Define the list of fields we want to look for
    const hiddenFields = ['utm_source', 'utm_campaign', 'utm_medium', 'utm_content', 'utm_term'];

    // 3. Loop through them and fill the form inputs if data exists
    hiddenFields.forEach(field => {
        const value = urlParams.get(field);
        if (value) {
            // Find the input field with the corresponding name attribute
            const input = document.querySelector(`input[name="fields[${field}]"]`);
            if (input) {
                input.value = value;
                console.log(`Auto-filled ${field} with: ${value}`); // Optional: for debugging
            }
        }
    });
}
This script creates a URLSearchParams object (a native browser feature) that makes parsing URLs incredibly easy. It loops through our list, checks if the URL has data for that item, and if so, injects it into the input.value.
Step 5: The “Gotcha” (Timing is Everything)
This is the part where most tutorials fail, and where I got stuck for a long time.
MailerLite forms usually load via a “Universal JavaScript” snippet. This script loads asynchronously. This means your webpage might load your custom fillUTMParams function before the MailerLite form has actually finished rendering on the screen.
If your script tries to find input[name="utm_source"] before the form exists, it returns null and nothing happens.
To fix this, we need to tweak the MailerLite embed code to trigger our function only after the form has loaded. We will use window.setTimeout as a safety buffer inside the script’s onload event.
Here is the modified Universal Script you should use (replace the account ID with yours):
JavaScript
(function(w, d, e, u, f, l, n) {
    w[f] = w[f] || function() {
        (w[f].q = w[f].q || []).push(arguments);
    },
    l = d.createElement(e),
    l.async = 1,
    l.src = u,

    // THE IMPORTANT PART: Wait 2 seconds (2000ms) after load to run our fill function
    l.onload = window.setTimeout(fillUTMParams, 2000),

    n = d.getElementsByTagName(e)[0],
    n.parentNode.insertBefore(l, n);
})
(window, document, 'script', 'https://assets.mailerlite.com/js/universal.js', 'ml');

ml('account', '123456780'); // <-- REPLACE THIS WITH YOUR ACCOUNT ID
Why the 2000ms delay? The onload event signifies that the script file has downloaded, but MailerLite might still take a moment to inject the actual HTML form into your page. Giving it a 2-second buffer (2000 milliseconds) ensures the inputs exist in the DOM before we try to fill them.
Testing Your Setup
You’ve added the fields, the CSS, and the tweaked JS. Now, does it actually work?
- Open your browser in Incognito/Private mode.
- Paste your blog post URL and append some fake parameters:
https://techvigil.com/your-post/?utm_source=testsource&utm_campaign=testcampaign - Right-click on your form and select Inspect.
- Look for the hidden input fields in the HTML.
- If you see
value="testsource"inside theinputtag, congratulations! It works.
Now, when you submit that form, check your MailerLite subscriber list. You should see “testsource” populated in the utm_source column.
This is massive for organizing your data. You can now distinguish which specific tweet or Reddit comment drove the most signups.
Frequently Asked Questions (FAQ)
Q: Can I use this method with other email providers like ConvertKit or MailChimp? A: Absolutely. The logic is identical. You create the fields in your provider, add them to the form, hide them with CSS, and use the exact same fillUTMParams function. You just need to make sure the input[name="..."] selectors match what your provider generates.
Q: Why use setTimeout? Isn’t there a cleaner way? A: In a perfect world, MailerLite would provide a “callback” function that runs immediately after the form renders. However, documentation on that is sparse. The setTimeout method is a robust, “brute force” way to ensure the form is ready without writing complex observers. It’s simple and it works.
Q: Will this slow down my website? A: Not at all. The script is incredibly lightweight, and because the MailerLite script is async (asynchronous), it doesn’t block the rest of your page content from loading.
Q: What happens if a user visits without UTM parameters? A: The script checks if (value) before trying to fill anything. If the visitor comes directly to your site (no UTMs in the URL), the hidden fields simply remain empty. Your form submission will still work perfectly; those fields will just be blank in your database.
Leave a Reply
You must be logged in to post a comment.